ad 1

Friday, August 9, 2013

P-51C Engine Ignition Harness continued

I finished installing the ignition wires on the other side of the top of the engine in the same manner as discussed in the previous blog. Here's what it looks like.


For the ignition wires on the sides of the cylinders, I had to use a different approach. I cut short lengths of the metallic string and glued a short piece of .020" plastic rod to the end and painted the rod silver.


To prepare the harness for attachment to the engine, I cut a very thin strip of .010" thick and formed them into J-shaped clips that were glued in the proper position on the harness.


I painted the new pieces silver and glued the harness in place. With the wires I cut the plastic rod a little shorter so it matched a scale length and test fit and cut the string so it was the correct length to reach from the harness to the spark plugs, which are nothing more that .020" plastic rod glued in the appropriate locations on the cylinders.

I glued the end of the string to the harness first and then glued the rod to the spark plugs at a slight angle. Use a picture of the actual Merlin as reference to get this right. Don't run the wires straight to the spark plugs. The real wires had a little bend and slack in them. The wires on the Merlin were attached to the plugs with spherical joints which is easy to create using some thick adhesive. I tried using super glue first, but it shrinks when it sets so it didn't create the right shape. But I had some JB Weld laying around, so I mixed some up and dabbed a little blob in the joint and it formed the perfect shape. 


After a little silver paint, the ignition wires look extremely similar to the ones on the real Mustang.


The first side of the engine is done.


Saturday, July 20, 2013

P-51C Mustang Engine Ignition Harness

So there was a slight change from the last post, but if you read the introduction to this project, you know I said I would admit my mistakes. Well this wasn't really a mistake, more of a "oops that won't work" thing, which happens in projects like this. You have to be prepared to have these moments. Nothing is perfect the first time. That's how you learn.

So for the ignition harness wires, I first tried to take metallic string and coat them in super glue so the strands would stay together, but this made the string too stiff and it was a pain to try to glue in place. I wanted them to be stiff, but not that stiff. So I scrapped that idea, cut off all those pieces of string and went in another direction. Instead of coating the entire string with super glue, I coated only the tip to keep the strands together. Then I glued the tip of the string in place on the engine, coated a small portion of the string in glue in the area where I would be cutting it, let it dry, cut the string to length with a set of nail clippers, and then carefully glued the end to the harness.


The uncoated string bends more easily and looks more like the real thing. You don't want to have any sharp bends or obvious straight areas in these wires or it will look really fake and weird.


Half way done. I'd say it looks pretty good for being plastic and string

Friday, July 12, 2013

P-51C Mustang Engine Ignition Harness and Oil and Fuel Lines

Finally after having way too much time away from my Mustang I could finally get back into it. So I left off working on the ignition harness. The wires on the real Merlin were silver braided cables which is odd to scale down. At first I tried using elastic, strangely enough, from an old pair of underwear. Just a side note: Sometimes as a scratchbuilder you have to explore some pretty strange options to find materials. The elastic didn't have the right pattern and once it was painted it become too stiff and the paint cracked off. So scratch that idea. I found a roll of metallic thread buried away in my work bench, but it had a slight problem. Once I cut it, the three strands that made up the thread separated. To fix this, I coated the thread in CA to bond the strands and could then cut some pieces that would stay together. Now, the pattern on this thread isn't quite the same as the real Merlin, but it is quite similar. And the natural color of the thread means it doesn't have to be painted.


I'll install the harness soon, but for now here are a few more pictures of the the oil and fuel lines going into place. Before you start a task like this, let me assure you that it is indeed a tremendous pain in the stabilizer, but well worth the effort. If you didn't read my last post, the lines are made from two sizes of Ook hanging wire available at any hardware store and for just a couple of bucks. The really big line in the picture below is made from a jumbo paper clip.


The little nubs representing the fitting on the ends of the lines, as seen below, were created with a blob of JB weld that, once hardened, was sanded flat on two sides. Silver Testors paint matches the natural aluminum color of the wire, which makes it great for hiding any mistakes or glue that may have leaked out of the joints.

Wednesday, June 5, 2013

P-51C Mustang Engine details

Now that the engine has been fully assembled, its time for some detailing fun. It's gonna take a great deal of research to figure out where all the oil, fuel, coolant, and ignition lines connect, but that's part of the fun. I started out by making the ignition harnesses out of some .040" plastic rod and then cutting things to length.


Here are the parts painted. The black part in the middle was made from .040" plastic rod that was heated and bent. This will connect the two ignition harnesses and the magneto.


While the paint was drying on the ignition parts, I experimented with making my first oil line. I used thin aluminum wire to make the line. I found some hobby hanging wire made by Ook at Home Depot. Ook is a company that makes wall hanging hardware for pictures, frames, etc. But they also have various size aluminum wire which is a perfect diameter for 1/32 scale fuel lines. As an airframe and powerplant student I would call this stuff lockwire or safety wire, which you could also use. However the Ook stuff is cheaper and you get a lot of it. Its easily flexible, but stiff enough to stay where you put it. Some other small wire, if you bump it, it bends. But as you can see, this stuff works and looks great.


 And it looks even better connecting my scratchbuilt oil relief valve and oil filter. Soon there will be alot more lines crawling all over the engine. But unfortunately I'm moving, so the work might have to wait a while

Friday, May 24, 2013

P-51C Mustang Engine - Painting

So now painting begins on the engine and I had to take a few lessons from the late Bob Ross on this one. Now I have painted several models, I know airbrushing pretty well, but it still amazes me how much you can learn even if you have mastered something. For instance: I had all my engine components glued on toothpicks and had bought a bottle of Model Master Semi-gloss black and was ready to start airbrushing. I went to mix the paint with my airbrush thinner and it wouldn't mix. It was like oil and water. I looked at the paint bottle and realized I had bought acrylic paint, not enamel. At first I was quite annoyed that I had no way to airbrush acrylic paints, but then I grabbed a brush and painted a little piece of scrap plastic just to see how it came out. I was pleasently surprised that this acrylic paint left no brush marks on the plastic. Lightbulb! So I test painted one of my components and sure enough, it looks like it was airbrushed. No brush marks. So as Bob Ross would say, we don't have mistakes, we have happy accidents. There is however a method to be followed when painting anything.

In order to prevent brush marks, the paint in the brush has to be kept wet. If you have ever painted a large area before, you may have noticed that when you first start brushing the paint goes on nice and smooth. But as you continue streaks start to appear and the bristles become stiff. This is because the paint in the bristles is starting to dry and it sticks the bristles together. This is what forms the brush marks. You need to continually clean the brush while you paint. I keep a jar of lacquer thinner on my paint carousel and every couple of minutes I clean off the brush, dry it, and reshake my paint. Taking the extra minute to do this can really make a difference in the paint job.

Since fully black painted parts don't really look that good in pictures, I didn't take any of the painting process. I think you know what painted parts look like. So onto the detailing. On most Merlin engines that I have seen the engine is painted black, but the nuts and bolts are a natural metal color. So on my model the nuts and bolts have to be painted aluminum. Luckily the model is detailed enough to have a few hundred fasteners molded onto it, but painting tiny little things like this without messing up the paint around it is the real challenge. Again, I took a lesson from Bob Ross. Time to pull out the knife. I found that the best way to paint these fasteners was by dipping the tip of my X-acto knife in the paint and lightly touching it to the part. Now the idea behind this is not have big aluminum blobs, its to create subtle glistens. Its a detail that really won't be obvious, except to the trained detail-oriented eye. Others will see it after I point it out, I'm sure. But if you look at the pictures below, you'll see that these tiny little details can really make the engine look good and are well worth the time.


Friday, May 17, 2013

P-51C Mustang Engine Details - Continued

There were a few more details to scratchbuild before painting could begin. I used the same methods mentioned in the last blog to assemble the oil filter and the duel drive. It's odd that a kit as detailed as this would leave off the duel drive that is mounted to the front of every Merlin directly below the propellor shaft. Even the Trumpeter kit has this detail, it looks like crap, but at least it has it.

The oil filter was fairly simple. The worst parts were trying to figure out how to simulate the bolts. I eventually used very thin wire cut to length. I cut slots in the flange with a thin razor saw and epoxied the wire in place.


The duel drive presented a fun challenge since it has to fit inside the engine mount framing and that hasn't been built yet. I guess that will make it a challenge later in the project. Using several images, I broke the component down into basic shapes using a .080" rod as a base to hold everything together.


I slid all the pieces together on the rod like a shish-ka-bob and added the details.


There were a few hose connections made from .030" rod and cut them down after the glue dried.


Here you can see the size of all the details. Next up...painting

Thursday, May 9, 2013

P-51C Mustang Engine - Oil Relief Valve

So I've realized that when scratchbuilding you have to be willing to fail a few times in order to end up with something that looks good. In the last blog I talked about the oil relief valve and how it would look much better if it was scratchbuilt. This is true, however the process took me a while and I had to check several sources of reference to get a good picture of it. The problem when you do these sorts of projects, especially with older aircraft, is that you will find ten different versions of the same part or component and since most of these aircraft have been restored using more modern parts it is hard sometimes to separate history from modern efficiency. Luckily I have the 1944 release of the Rolls-Royce Merlin V-1650 overhaul manual. I actually found a good picture of the oil relief valve in the back of the manual in a diagram showing how the spare parts bin should be set up. It's odd sometimes where you find information, so don't be afraid to look in weird places for references.

Ok let's get into it. So first I tried to use an image I found online, but I couldn't really see how the relief valve looked. The simpliest way to create a scratchbuilt part like this is to break it down into simple shapes, and with this image, I couldn't see the real shapes. So I went with what I saw. The next couple pictures do not show the final relief valve, but they will give you a good idea of how the beginning of the scratchbuilding process. Start with a base of basic shapes. Details come later. I started with simple plastic rod and strip and started arranging them as I thought I saw in the image.


Now as good as this may look at a start, granted there are no details, this actually isn't how the valve looked. But at least you can get a good idea of how some simple shapes can be formed to make something that looks complex. And had I used this in the model, no one except a Merlin mechanic would be able to tell me that I was wrong. However, anything can be done better and when I found a really good image of the relief valve and could break down the component into simple shapes, I realized I could do it much, much better.

I started with a piece of .030" x .060" and cut and filed it to the proper shape. I left a "tail" on the strip so that it would be easier to handle while assembling. The component will eventully be cut off.


I glued a .040" rod to the bottom and started adding the simple shapes, some half rounds and strips. The rods sticking out the sides will be where the oil lines will eventually connect. I made them intentionally long so its easier to hold while gluing it. This is a trick when scratchbuildling that most people don't see with they look at the finished product. They see all these little parts and wonder what tiny tweezers and magnifiers were used to glue the parts in place. I just used my fingers. Remember, you can always cut and sand them down to the proper length later. A tip: Make sure the glue has dried completely before cutting it or you will definitely ruin your day.


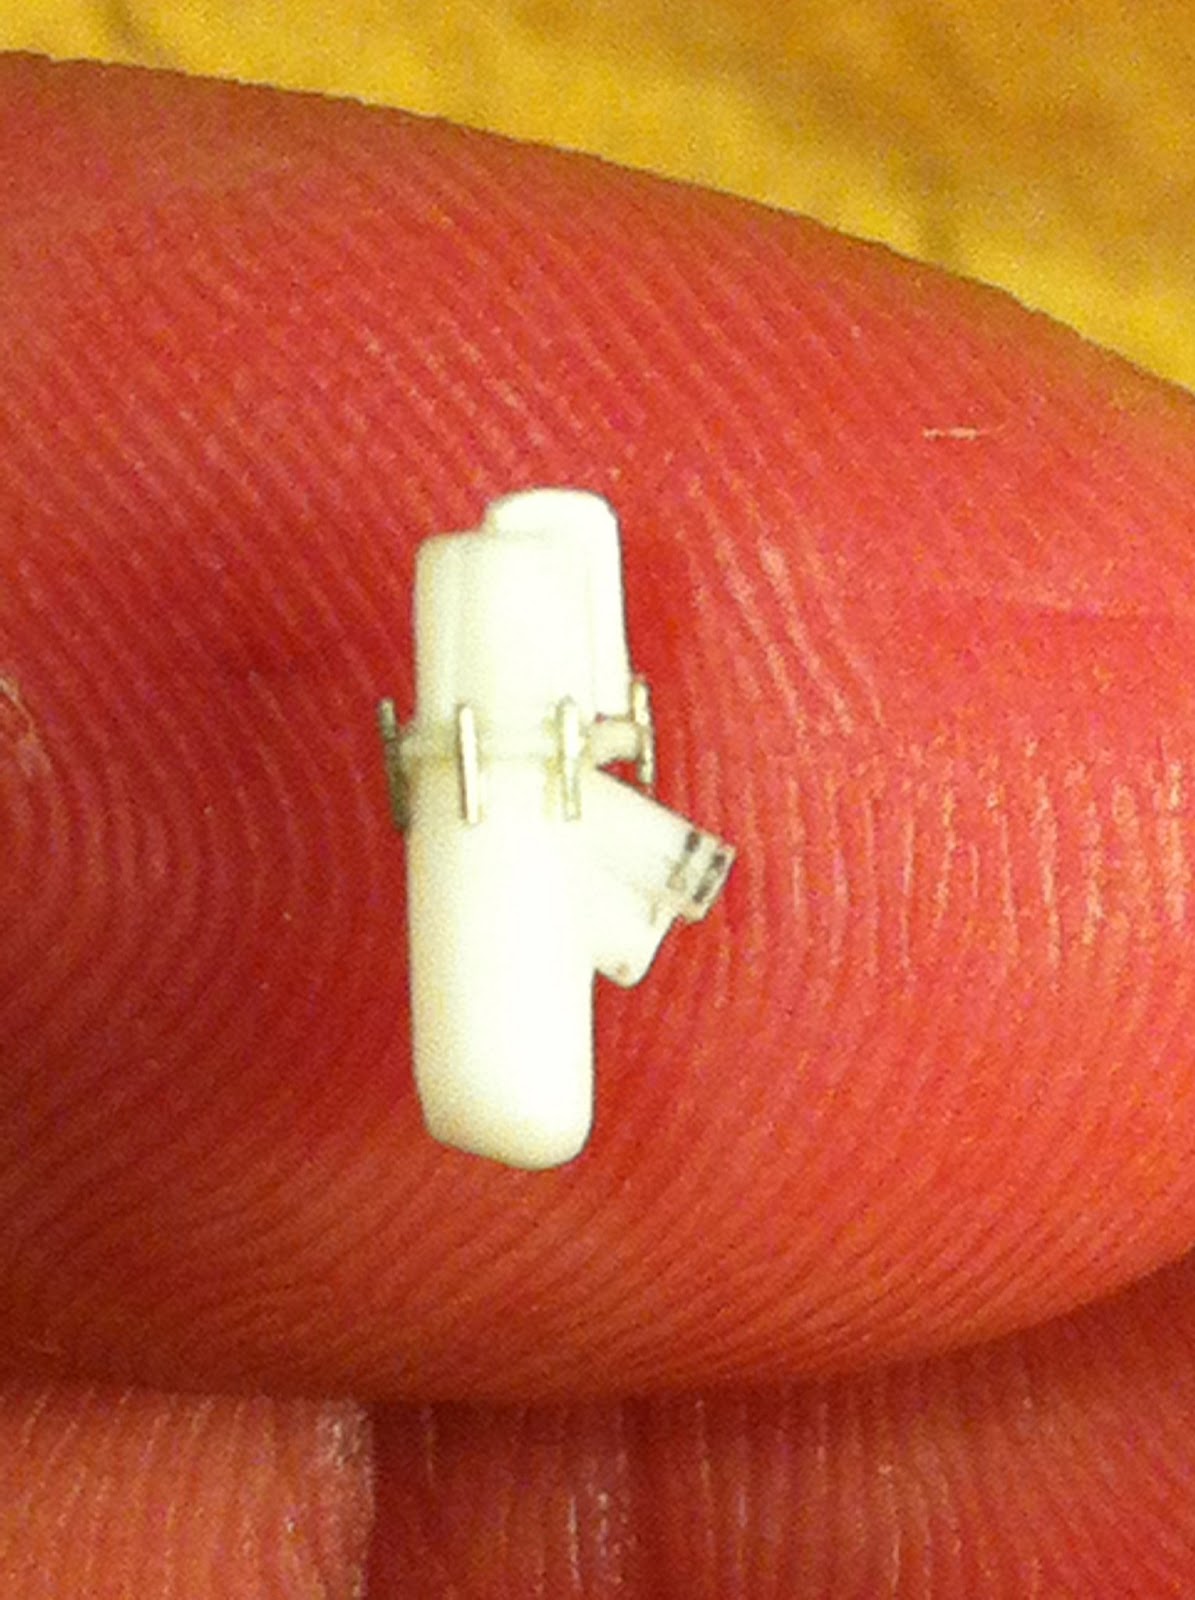
The relief valve was held to the side of the engine with 8 bolts which will be represented by some very thin wire. But first I need the mounts. These were made with .020" rod glued into position. Its hard to see in this image, but they were left long and cut down.


All the rods were cut and filed down to the right length and .010" holes were drilled as close to center as possible. A few details were added to the top with .040" rod and .020" wire.


.008" wire was fed through the holes and epoxied in place. Again, the wires were longer than needed when I installed them. I made sure that the exposed wire on the front of the part were the proper length and allowed the excess to stick out the back. It would be much easier to cut the end that wouldn't be seen. So why make these out of actual wire. Well, this will eventually be painted black like the rest of the engine, but the bolts will be an aluminum color. So once its painted, I'll simply take an X-Acto knife and scrape the paint away from the bolts. This is much easier than trying to paint them afterwards. And I don't have any plastic that thin.

 
So after cutting off the "tail" and adding a few more details, here is the finished oil relief valve.